Physical OpenGPG keys
April 28, 2020
Smart card reader
Recently, I updated my personal computer from 2014 MacBook Pro to the ThinkPad P1 gen2. Two other competitors are Apple MacBook 16 and Huawei Matebook Pro in the last round. Both of them are great product but ThinkPad surpass them in terms of ports – two USB-A, SD card reader, two USB-C, and full size HDMI. You would definitely love the first two kind of ports if your interact with physical robots.
What surprise me is that Lenovo still managed to fit a full size smart card reader into the slim chassis. The smart card are often used in big organisations to let employers authenticate themselves using a physical card e.g log into computer in the enterprise domain.
I am not aware of any personal use case until I come across the OpenGPG card. The OpenGPG card has the same form factor as the credit card but the chip is designed for various cryptographic tasks. I purchased mine from the FLOSS shop and the lastest version of OpenGPG card has:
- OpenGPG compatibility
- RSA storage up to 4096 bit
- Key generation on card
- Hardware random number generator
- Works with GunPG
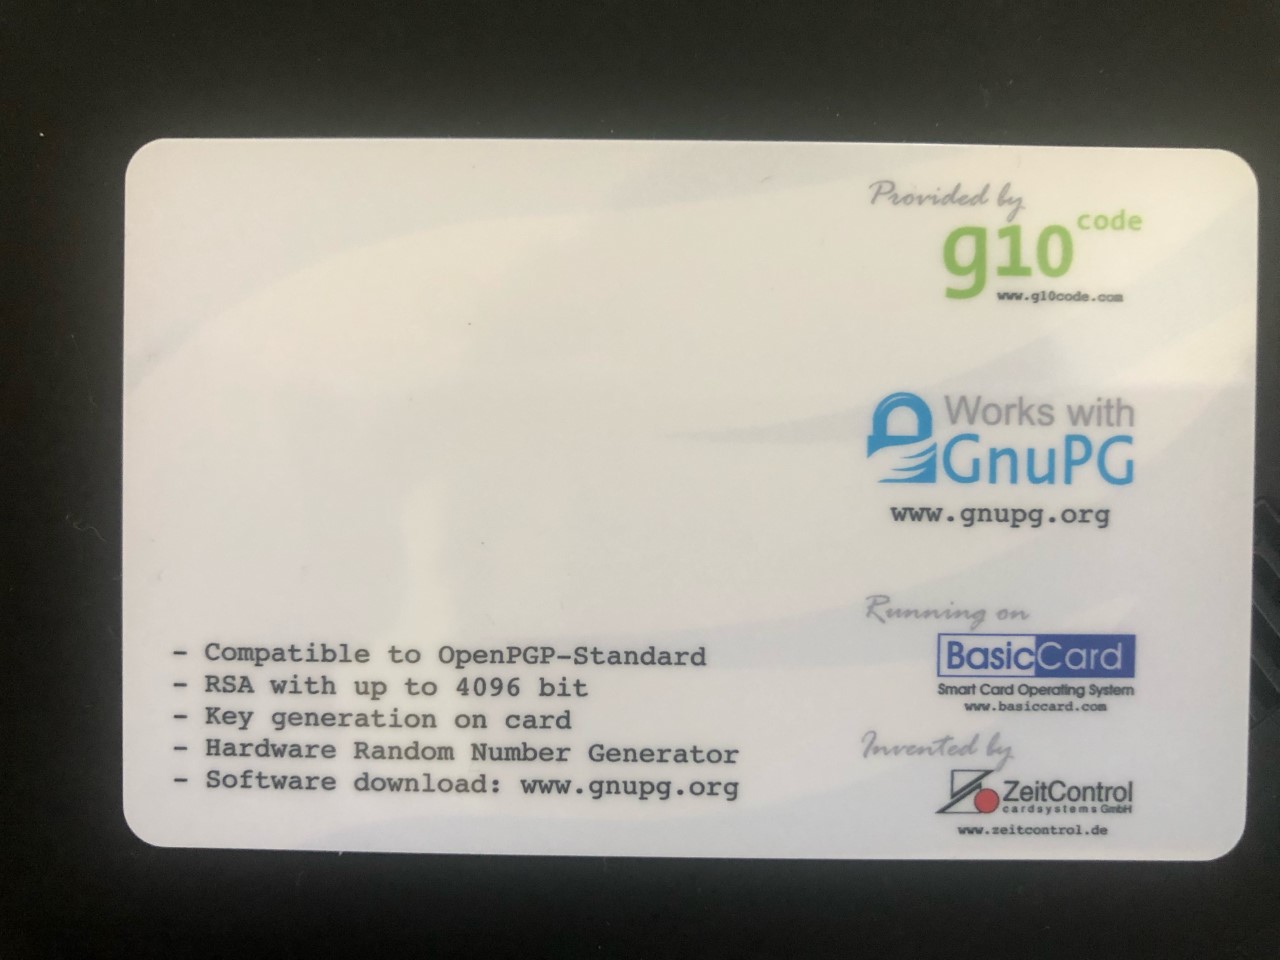
Back of OpenGPG card
The OpenGPG compatibility and the key storage capability are the two features I am fond of. This setup guide may help to to harness those features if you own a card (or OpenGPG compatiable Yubikeys).
Setup the card
There are a few packages we need to set up the card on Ubuntu 18.04.
sudo apt install pcscd scdaemon gnupg2 pcsc-tools opensc -y
gnupg2 is the open-source implementation of OpenGPG standard, we will use it to edit the card information and manage our keys later. The other packages are the driver, daemon and configuration tool for the smart card reader.
First of all, we would like to scan the computer to find the smart card reader.
pcsc_scan -n
The result would like below:
``` PC/SC device scanner V 1.5.2 (c) 2001-2017, Ludovic Rousseau ludovic.rousseau@free.fr Using reader plug’n play mechanism Scanning present readers… 0: Alcor Micro AU9560 00 00
Wed Apr 29 18:07:54 2020 Reader 0: Alcor Micro AU9560 00 00 Card state: Card inserted, ATR: 3B DA 18 FF 81 B1 FE 75 1F 03 00 31 F5 73 C0 01 60 00 90 00 1C ```
The smart card reader is at AU9560 00 00 and I could add it to the daemon
echo "reader-port \"Alcor Micro AU9560 00 00\"" > ~/.gnupg/scdaemon.conf
After the reboot, you would able to initialise the card:
gpg --card-edit
the command will show the information of your OpenGPG card and start the gpg interactive prompt.
``` Reader ………..: Alcor Micro AU9560 00 00 Application ID …: D2760001240103030005000092990000 Version ……….: 3.3 Manufacturer …..: ZeitControl Serial number ….: 00009299 Name of cardholder: [not set] Language prefs …: [not set] Sex …………..: unspecified URL of public key : [not set] Login data …….: [not set] Signature PIN ….: forced Key attributes …: rsa2048 rsa2048 rsa2048 Max. PIN lengths .: 64 64 64 PIN retry counter : 3 0 3 Signature counter : 0 Signature key ….: [none] Encryption key….: [none] Authentication key: [none] General key info..: [none] gpg/card>
```
The card is capable of generating gpg keys on its chip in admin mode.
To enter this mode, type admin command and then help to show available operations.
``` gpg/card> admin Admin commands are allowed
gpg/card> help
quit quit this menu
admin show admin commands
help show this help
list list all available data
name change card holder’s name
url change URL to retrieve key
fetch fetch the key specified in the card URL
login change the login name
lang change the language preferences
sex change card holder’s sex
cafpr change a CA fingerprint
forcesig toggle the signature force PIN flag
generate generate new keys
passwd menu to change or unblock the PIN
verify verify the PIN and list all data
unblock unblock the PIN using a Reset Code
factory-reset destroy all keys and data
```
we will use the generate command to generate new keys.
In the card editing process, you will be asked you to back up the encryption key onto your hard disk. It is a good idea to move the back up keys to another device in case your card is damaged or not accessible. During the process, there are few more questions to answer and you need to confirm your ownership of the card by entering the Standard PIN and Admin PIN when necessary. The default PINs are
Standard PIN: 123456
ADMIN PIN: 12345678
Of course, those PINs need to change immediately after (use passwd command in admin mode) you create PGP keys. Also when asked about the PIN, it means the standard PIN instead of Admin PIN.
After finish the interactive configuration process, the gpg keys are generated and stored on your smart card. Your computer does know the signature of the public key but the private keys are stored on the card. (Remember to remove the backup key to a safe place before proceeding)
To view the gpg keys on the card, simply type list command and all keys will be shown.
Finally, we also like to add the smart card to gnome keyring service.
Edit the /usr/local/bin/gnome-keyring-daemon with follwing lines
bash
#!/bin/sh
/usr/bin/gnome-keyring-daemon --start -c pkcs11,secrets
and enable the GunPG agents
echo "use-agent" >> ~/.gnupg/gpg.conf
echo "enable-ssh-support" >> ~/.gnupg/gpg-agent.conf
The smart card can now be used as a normal PGP key in your workflow. In my workflow, there are some use cases I do enjoy using the smart card.
Git signing
Git commit can be submitted to the repository by anyone who has write access. The information of committer can be arbitrarily assigned using git config. Git signing is a proper way to prove the identity of the committer.
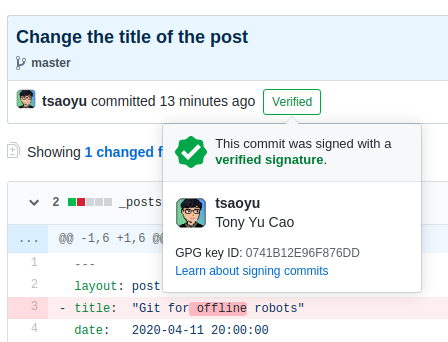
Verified git commit
Upload your public PGP key to GitHub
Get your public key from GnuPG:
gpg --armour --export YOUR_EMAIL_ADD
and paste that into https://github.com/settings/keys.
Setup Git GPG key
Git let GnuPG sign the commit and you only have to inform which key to use if you have multiple signing keys. Git might able to find the right key if there is only one key but to be more secure it is better to confirm which key you are having on the card.
git config --global user.signingkey YOURKEY_SIGNATURE
where YOURKEY_SIGNATURE is the general key info for your gpg keys.
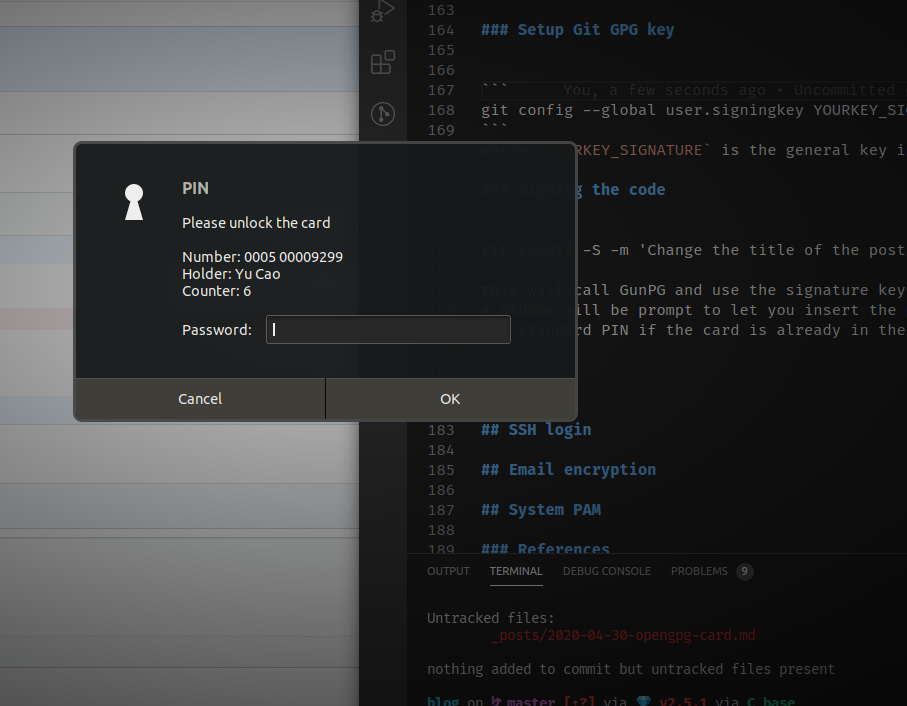
Signing the code
git commit -S -m 'Change the title of the post'
this will call GunPG and use the signature key to sign off the commit.
A window will be prompt to let you insert the physical card and ask you for the standard PIN if the card is already in the reader.
If everything is configured properly, this commit will have a verified status on GitHub.
Email encryption
Another use case I would prefer OpenGPG card is the email signature and encryption. Since my computer is dual boot in Linux and Windows, I would have to keep two sets of keys if I don’t have a way to share them. The smart card address this issue by storing the key on the chip and I don’t have to worry about the leak of private keys. When it comes to the email clients, there are many options on under different operating systems.
Thunderbird + Enigmail on all major OS
Enigmail add-on provides email signature and encryption support with OpenGPG. This is the first choice for me as the solution works on all platforms: Linux, Windows, and macOS.
Outlook + Gpg4win on Windows
Sometimes, you do need Outlook to arrange a few things for you and this when Gpg4win step in. If you do enjoy the integration of Microsoft productivity suite, go for this.
Apple mail + GPGTools on macOS
Similarly, there is a native option for macOS users. The only downside is that GPGTools is not free anymore.
SSH login
I haven’t try SSH login by myself because my organisation blocked the 22 port and I use SSH over HTTPS. You can refer to this Gist for more information about SSH login using GnuPG agent.
Final thought
The answer to “Would you need a card to protect yourself” will largely depend on your workflow. The physical card is an addtionaly layer of protection to your sensitive data and curcial accesses. However, the system security cannot be guaranteed by the physical encryption devices itself. I would recommend to use the chance to revisit your security practise before investing on the device. Also, it worth to consider USB based physical keys such as Yubikey if you don’t have smart card reader.
References
https://blog.programster.org/yubikey-link-with-gpg
https://gnupg.org/howtos/card-howto/en/ch03s03.html
https://stosb.com/blog/using-openpgp-keys-for-ssh-authentication/